| 
Fence 101: A Quick How-to Guide
By Mark Clement
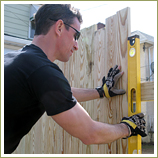
When beginning any large-scale outdoor living project, choosing the correct building material is paramount. For Mark Clement, pressure-treated Southern Pine was the best choice for a recent fence project he completed. Long a favorite material for decks, fences, gazebos, raised garden beds and more, pressure-treated Southern Pine is real, natural, strong, durable and beautiful.
Layout—Corners First
Install the first and last posts of a fence in any single line first (typically on the property line).
Then pour quick-setting concrete and let it dry.
If the fence makes any turns, try to install the end post on that run as well.
From near the bottom of these posts, pull a mason's string between them on the outside edge. That's the layout line for the rest of the posts; you can count on a tight string to be straight.
Tip: set the posts higher than their finished height so you can cut them to the exact layout height after they're installed.
Layout—Field Posts
Next, lay out post locations on 8-foot centers in the field.
Pull a measurement from the corner post and wrap a piece of brightly colored tape (caution tape works well) around the string every 8 feet.
Post Holes
At the tape, pull the string out of the way (try pinning it to the ground with a scratch awl) and dig the post holes.
On a fence like this it is important that you get close—not exactly on—8 foot centers; more on that later.
Dig 30-inch post holes both to get a good amount of earth bearing on the post and to get below the frost line (if this is a geographical concern).
Setting Posts
Set each post plumb along the string making sure it is plumb north-south and east-west.
Once it is dead straight, nail or screw "bridge-braces" (scraps of 2x4s) to each side to hold it fast. It helps to pound the bridge-braces into soft earth to give them some holding power.
Do this to 3-4 posts then go back and pour concrete so it can start drying.
In really cold weather, try using quick-setting concrete on all the posts (which might double the concrete cost.)
Again, set the posts well above the finished height.
Draw a string tight across the finished height just to be sure.
Cutting Posts
With the posts set and concrete solid, pull a mason's string tight across the post tops at the finished height then mark a square line across the post tops.
Use a circular saw and cut the posts to the finished height.
Backfilling Post Holes
Once the concrete is dry and hardened (usually in 24 hours in nice weather), go ahead and backfill the holes, tamping the dirt down firmly (don't go crazy, you'll move the post or break the seal with the concrete) every 8-12 inches or so with the head of a digging bar or sledge hammer.
All you want to do is thrust the implement into the hole just a little harder than if you'd simply dropped it. This packs the dirt around the post and firms things up.
Setting Rails
Mark 9 1/2 inches down from the post tops and square a line. This marks the bottom edge of the top rail.
Depending on the contour of the ground, measure down 30-40 more inches (try not to spread rails more than 48 inches) and mark the bottom rail location the same way.
You'll recall that we set the posts at approximately 8-foot centers. So you don't have to fiddle around with an inch here or there on layout, use 10-foot 2x4 stock for the rails. Hold them in place with screws set just below the rails as cleats. Then mark, cut and nail them so that each rail lands in the center of the post.
Slats
The 1x4 slats you used are butted one to the next and will deliver a fast-to-install privacy screen effect.
You might purchase these in 16 foot lengths. If so, cut them in thirds, install them right to the ground to clearly divide the yards and hold the dog and soil back.
Tip: if it's practical, try laying a 2x4 flat on the ground under the slats when you install them to leave a 1 1/2 inch gap a weed-whacker can fit under.)
Once they are all installed, snap a line and cut them to your specific layout all at once. Making the cut this way is fast, easy, accurate, and (if you're good with a circular saw) straight.
Note: on a really long run of fence, consider snapping 3 lines. You can only pull the string so far before it sags and/or won't leave chalk.
Gate
This is where you can really get creative. Choose your favorite basic gate hardware and follow the installation instruction. Two operable gates at 2-feet wide work great. One gate panel is held fast with a cane bolt; the other operates daily. A nice little 1x4 detail at the top added just a little, simple shadow line.
Repairing the Landscape
As a finishing touch, plant grass seeds around your post hole locations for a finished, clean look.
Mark Clement is a remodeler in Philadelphia, PA and author of The Carpenter's Notebook, A Novel www.FormalFarmHouse.com.
|
 Links we like