Dining Room Picture Moulding Project
Project Pine 411: Dining Room Picture Moulding
Challenge: Give dining room a more formal look
Solution: Southern Pine “picture” moulding adds elegance to the room without breaking the budget
Total Project Cost: $105.72
Total Project Time: 8 hours, including time spent shopping for materials and painting
Tools Needed:
Compound Miter Saw
Hammer
Level
Tape Measure
Calculator |
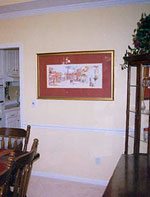 Before:The dining room walls seemed bare before, even
though a chair rail had been installed halfway up the walls.
Before:The dining room walls seemed bare before, even
though a chair rail had been installed halfway up the walls.
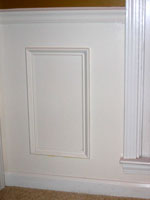
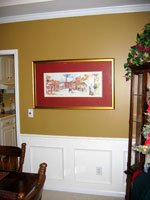 After: The new Southern Pine picture
mouldling gave the walls more texture, and painting the lower portion of
the walls a creamy white adds a more formal feeling to this dining room.
After: The new Southern Pine picture
mouldling gave the walls more texture, and painting the lower portion of
the walls a creamy white adds a more formal feeling to this dining room.
James and Brittain enjoyed entertaining friends in their formal dining room, but they felt that the room itself didn’t actually feel very – well – formal. The room already had a chair rail installed about halfway up the wall, so Brittain suggested that Southern Pine moulding installed as “picture” moulding on the lower half of the walls might give the walls more texture and create a more formal atmosphere in the room.
Brittain and James couldn’t be more pleased with the results of their latest project.
“Our kitchen leads directly into our dining room, and you can see the kitchen from the dining room,” explains Brittain. “The Southern Pine picture moulding made such an improvement on the dining room that it actually makes our kitchen look better, too!”
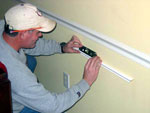 Be sure to use a level after tacking the top
moulding to the wall but before installing the bottom and side pieces to
make sure your "picture" panels will be level.
Be sure to use a level after tacking the top
moulding to the wall but before installing the bottom and side pieces to
make sure your "picture" panels will be level.
Steps:
Find a friend who owns a compound miter saw and has already put in chair railing or picture moulding in his or her house (or rent one from your local home improvement store);
Measure the length of the walls in the room you will be working;
Decide how much space you want between each picture moulding panel and the corner of the wall;
Decide how many panels (or “picture” squares) you want on the wall;
Add the number of spaces and multiply them by the length you want between each panel;
Subtract the required space measurement from the total wall measurement;
Divide the remaining balance by the number of panels you are putting on the wall;
Repeat for each wall;
Determine how much space you want between the base boards and chair rail to the top and bottom of your Southern Pine picture moulding; measure the length from top to bottom;
Multiply the vertical length by two, then multiply that number by the number of panels you’ll be installing;
Add up the length of the moulding you will need, then go purchase it;
Now relax – the hardest part of this project is over! All that remains is cutting the 45 degree angles with the miter saw (and the new, fancy saws tell you exactly where to put the blade!);
After the moulding has been cut, start measuring the vertical and horizontal space requirements, and tack in the corner of the top piece. Use a level to make sure it is straight, then nail it in place. Repeat for the bottom, then fit the side pieces in place and nail. Don’t worry – a little caulk (or a lot in my case) can fix most measurement errors.
Measure your space from the first panel and repeat the previous step until done;
Be very nice to your spouse – if you are lucky he or she will paint the room to finish the project!
Materials Purchased:
Southern Pine base cap moulding (primed)
Painters Caulk
20-Gauge Finish Nails
Total |
$95.14
2.58
8.00
$105.72 |
 Links we like