Built-In Bookshelves Project
Project Pine 411: Built-In Bookshelves
Challenge: Organize living area
Solution: Built-in bookshelves crafted of Southern Pine create functional space for books, photographs and collectibles
Total Project Cost: $218.49
Total Project Time: 2 days
Tools Needed*:
10” Electric Miter Saw (makes much neater cuts than a miter box, and is also faster and easier)
Air Compressor
16 Gage Finish Nail Gun (use for the 1x material and to nail the shelf supports to the wall)
18 Gage Finish Nail Gun (use for the small trim and crown, smaller nail for smaller wood)
4’ Level
Torpedo Level
16’ Tape Measure
*If you don’t own these tools or can’t borrow them, Home Depot or Lowe’s or any tool rental store should have them available. |
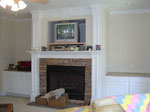 Den prior to adding built-in bookshelves on both sides of fireplace.
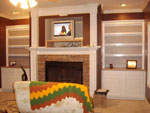 The built-in bookshelves, along with a bold new wall
color, make the den look more finished and polished.
The built-in bookshelves, along with a bold new wall
color, make the den look more finished and polished.
Gregg and Miranda purchased a new home recently. The house was accented with beautiful crown moulding, a chair rail and other decorative mouldings throughout. The living room has a fireplace in the middle of the back wall with floor cabinets on either side. These cabinets provided great storage space, but Gregg and Miranda wanted to better utilize the space above the cabinets as well.
After clearing the clutter from the top of the floor cabinets, Gregg and Miranda decided to add built-in bookshelves on both sides of the fireplace to make the room look more finished. “We built the shelves mostly with Southern Pine materials,” explained Gregg. “It’s such a strong wood, I know that we can store lots of books and other odds and ends and never worry about the shelves collapsing. Plus it is really easy to work with, and it was easy on our wallet.”
The shelves are now complete, and Gregg and Miranda couldn’t be happier. “The built-in bookshelves really completed the room,” said Miranda. “We were a little intimidated by the project at first, but once we got started it really was fairly easy and a lot of fun.”
Steps:
Decide how many shelves to build and how high each shelf needs to be by measuring
from the countertop. Gregg and Miranda decided to build four shelves on each side. The
first shelf is 16� from the top of the countertop, and there is 13� between the other
shelves.
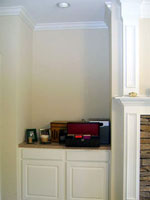 Before adding the bookshelves, a good deal of space
was wasted above the base cabinet and clutter had accumulated on top of
the cabinet.
Before adding the bookshelves, a good deal of space
was wasted above the base cabinet and clutter had accumulated on top of
the cabinet.
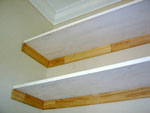
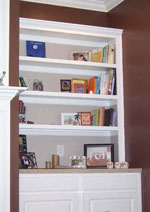 The Southern Pine shelves are beautiful and
incredibly strong, providing attractive storage and display space for
heavy books and collectibles.
The Southern Pine shelves are beautiful and
incredibly strong, providing attractive storage and display space for
heavy books and collectibles.
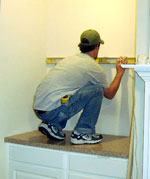
Measure and mark 16” up from the countertop;
Use the 4’ level to lightly scribe a straight, level line on the back wall with a pencil;
Take a measurement from side wall to side wall (Gregg and Miranda’s measurement was 49”);
Using the miter saw, measure and cut 45 degree angles on each side of the 324 Baby Howe casing (hold the board with the fat side of the casing up and flat against the saw fence - this may take two people to hold as the casing is very long);
Find your level line on the wall and install the cut casing using the 16 gage nail gun;
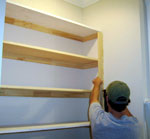
For the side supports, cut a straight or flush cut on one side and a 45 degree angle on the other side of the 324 casing. The measurement is the width of the shelf (a 1x12 board is actually 3/4”x11 1/4”), so cut the sides 11 1/4” long;
Using the torpedo level on top of the side supports you’ve cut, nail supports to wall. Nail the piece onto the corner stud in your wall and nail into sheet rock on the straight cut side (the outside of the shelf will be supported by the side rails);
Measure and cut the 1x12 board and install on top of the new wall supports (measure each time side to side at the back of wall and at the front of side supports – the wall may not be square!);
Measure 13” from top of first shelf and repeat steps 2 through 8 for the next three (or however many) shelves;
After completing all the shelves, measure and cut the top face piece out of the 1x4 stock and nail flush with the top of the first shelf;
Now measure from the countertop to the bottom of the top rail on both sides and cut to fit snug out of the 1x3 stock;
Hold tight to wall and shelves and nail two nails into each shelf;
Measure the distance between each side rail and cut and nail the 1x2 stock flush with the top of each shelf;
Measure the face of the top face piece and cut the crown moulding square on each end;
Now measure down from top shelf ½” and hold the crown at the angle on the back of the crown moulding and nail on the bottom edge using the 18 gage finish nail gun;
Last cuts are for the side trim. These pieces are easy to manipulate, so you can cover any little gaps you might have along the wall;
Measure the distance between the countertop and the bottom of the crown. Square cut both ends and nail to the sides using the 18 gage nail gun;
Repeat steps 1 through 17 for other side of fireplace;
Use wood filler for all nail holes (do not use caulk to fill nail holes – caulk will shrink!);
Caulk and paint.
Materials Purchased:
(2) 1x12x16’ SYP (shelves)
(1) 1x4x10’ SYP (face of top shelf)
(2) 1x3x10’ SYP (side rails)
(3) 1x2x10’ SYP (face of shelves)
(4) 324 Baby Howe Casing 2 ¼”x14’ (shelf supports)
(2) Pieces Window Stop (or your choice of side trim 14’ long – ¼”x3/4” screen moulding will work as well)
(1) 2 ¼” Crown Moulding 10’ long (to trim out the top of shelves)
(1) Box of 16 Gage Finish Nails
(1) Box of 18 Gage Finish Nails
(1) Tube of Caulk
(1) Gallon High Gloss White Paint
Total |
$55.04
4.80
1.97
7.20
79.80
5.76
7.00
17.99
17.99
2.98
17.96
$218.49 |
 Links we like